> ## Documentation Index
> Fetch the complete documentation index at: https://docs.upmind.com/llms.txt
> Use this file to discover all available pages before exploring further.

# How Does Provisioning Work?

> Step-by-step guide to provisioning in Upmind

From this guide, you will learn:

1. **How to Create a Web Server.**
2. **How to Create a Hosting Package.**
3. **How to Purchase the Hosting Package as a Client.**

## How to create a web server

1. First, create an account on any web hosting service such as **Plesk**.
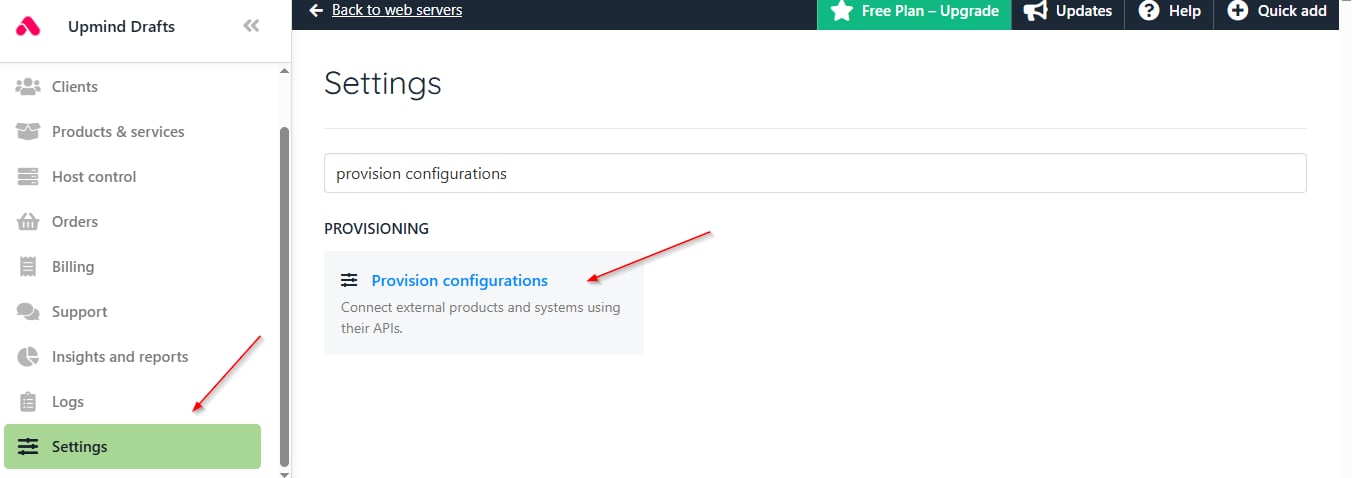
2. You can create and provision a *Web Hosting service* on **Host Control** > **Web Hosting** from the `Admin Dashboard` or **Settings** > **Provision Configurations**.
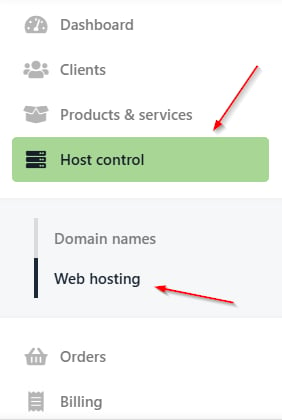
<Frame caption="Host control > Web hosting">
  <img src="https://mintcdn.com/upmind/6knUVC8F1nK4E5CY/images/fb/c44583d48368b494.png?fit=max&auto=format&n=6knUVC8F1nK4E5CY&q=85&s=637c64b580794e0705a4fc71e266119e" alt="alt text" width="282" height="420" data-path="images/fb/c44583d48368b494.png" />
</Frame>

<Frame caption="Settings > Provision configurations">
  <img src="https://mintcdn.com/upmind/VnCXiz5rboywDnvn/images/fb/dd50b1b77efe19e7.png?fit=max&auto=format&n=VnCXiz5rboywDnvn&q=85&s=c6785b07158f6edf0bb2379e3697995a" alt="alt text" width="1352" height="478" data-path="images/fb/dd50b1b77efe19e7.png" />
</Frame>

For this example, we will go in from the **host control**.

3. Click on **Add New** and select `Web Server`.

<Frame caption="Select web server">
  <img src="https://mintcdn.com/upmind/pcUdSuxUJ6LgBXnd/images/fb/a6c1f21c93f850bd.png?fit=max&auto=format&n=pcUdSuxUJ6LgBXnd&q=85&s=e3d1f04389c15d8bc417ba24dd1970f7" alt="Select web server" width="989" height="157" data-path="images/fb/a6c1f21c93f850bd.png" />
</Frame>

4. Type your *Web Hosting service* name and choose **Plesk**.
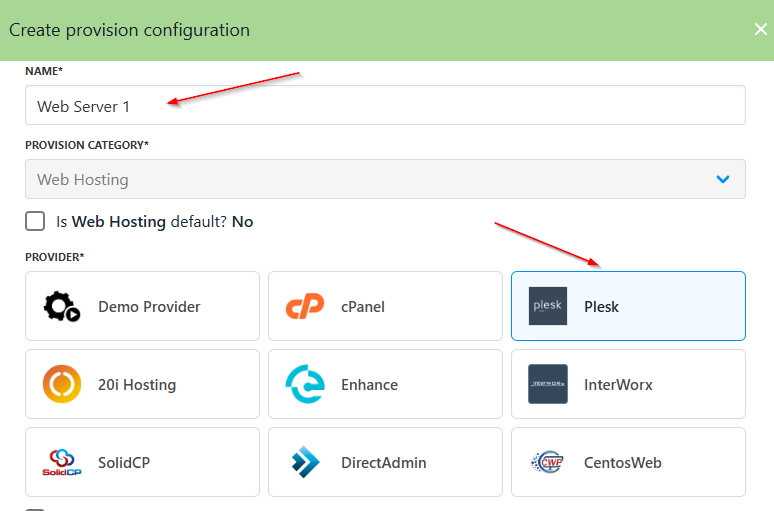
<Frame caption="Add the web server name and choose a provider">
  <img src="https://mintcdn.com/upmind/1xguIfYUrfespmVI/images/fb/8483c1fafeb0b315.png?fit=max&auto=format&n=1xguIfYUrfespmVI&q=85&s=a834a470f5676d61aabc689b7ce41d60" alt="Add the web server name and choose a provider" width="774" height="511" data-path="images/fb/8483c1fafeb0b315.png" />
</Frame>

5. Add all the necessary **Provision Configurations**, such as Host Name, Admin User Name, and Admin Password. All of the information can be found on your panel.
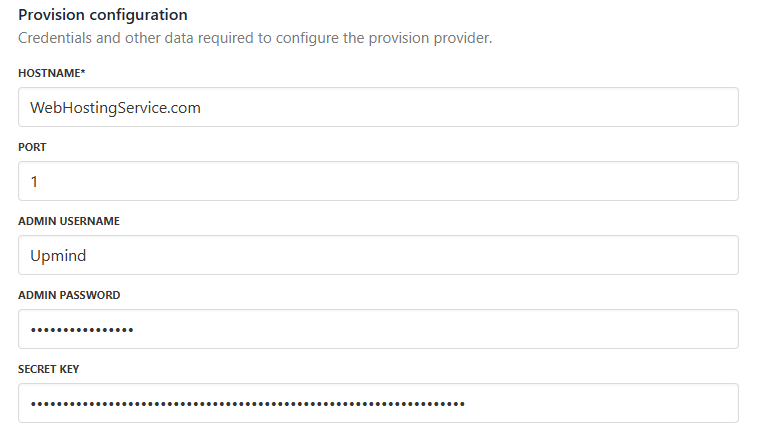
<Frame caption="Add provision configurations">
  <img src="https://mintcdn.com/upmind/1-uICsJi9zYpvJVH/images/fb/915c5cc3e4e73fe1.png?fit=max&auto=format&n=1-uICsJi9zYpvJVH&q=85&s=1314d672b71a1d9a91b3a3532dcfaf39" alt="Add provision configurations" width="765" height="432" data-path="images/fb/915c5cc3e4e73fe1.png" />
</Frame>

6. Afterwards, choose your operating system, fill in the optional configuration attributes, and then click **Create**.
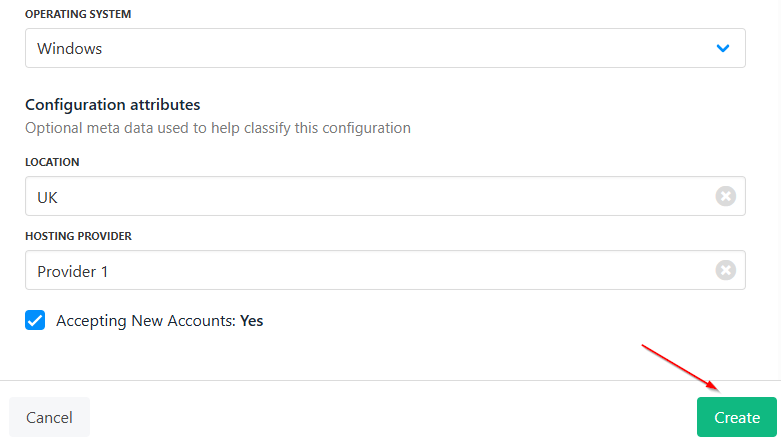
<Frame caption="Add configuration attributes and click create">
  <img src="https://mintcdn.com/upmind/kAlrCUxI2nwYz4_i/images/fb/1b9dffff00b1475f.png?fit=max&auto=format&n=kAlrCUxI2nwYz4_i&q=85&s=ae5a681b3c2533fbc9a1b9fba8426daa" alt="Add configuration attributes and click create" width="781" height="447" data-path="images/fb/1b9dffff00b1475f.png" />
</Frame>

## How to create a hosting package

1. Go to the Hosting Packages tab, then click on **Add New**, and select `Hosting Package`.

<Frame caption="Select hosting package">
  <img src="https://mintcdn.com/upmind/1xguIfYUrfespmVI/images/fb/86e2a23759266781.png?fit=max&auto=format&n=1xguIfYUrfespmVI&q=85&s=c1569a77ce9df5c8a326741f0ef66a52" alt="Select hosting package" width="1001" height="168" data-path="images/fb/86e2a23759266781.png" />
</Frame>

2. Create a [Product Category](/using-upmind/product-management/how-to-create-products#creating-a-category).
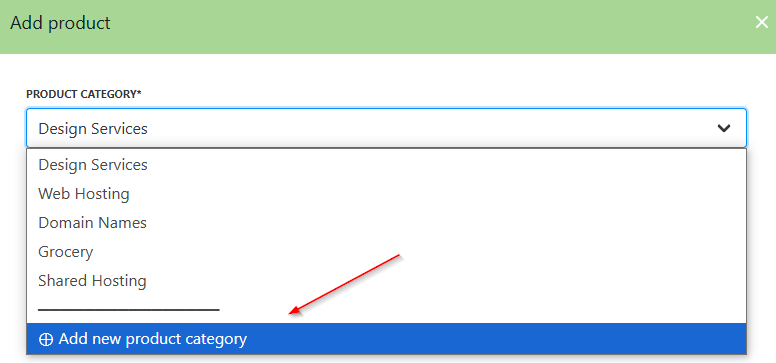
<Frame caption="Add product category">
  <img src="https://mintcdn.com/upmind/bPO2bBzOxYQR4tYr/images/fb/fe9fa20881fdcd0e.png?fit=max&auto=format&n=bPO2bBzOxYQR4tYr&q=85&s=f3d284060d97c8b3a8337374acf57697" alt="Add product category" width="776" height="363" data-path="images/fb/fe9fa20881fdcd0e.png" />
</Frame>

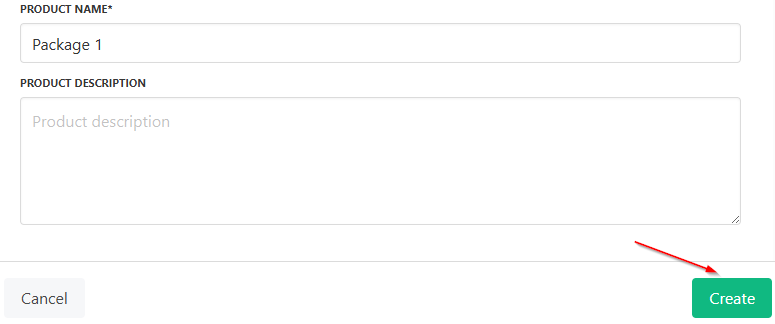
3. Write your `Product Name` and then click **Create**.
<Frame caption="Click create">
  <img src="https://mintcdn.com/upmind/Dgjmf3QWYVBR40cE/images/fb/5d357d756a857c98.png?fit=max&auto=format&n=Dgjmf3QWYVBR40cE&q=85&s=65117b3c712bf249225561e02f2ba449" alt="Click create" width="775" height="324" data-path="images/fb/5d357d756a857c98.png" />
</Frame>

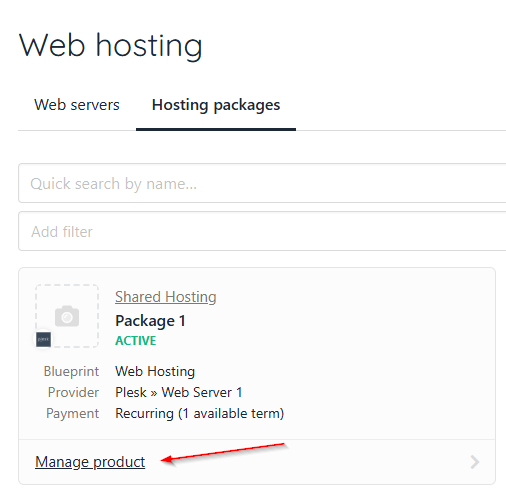
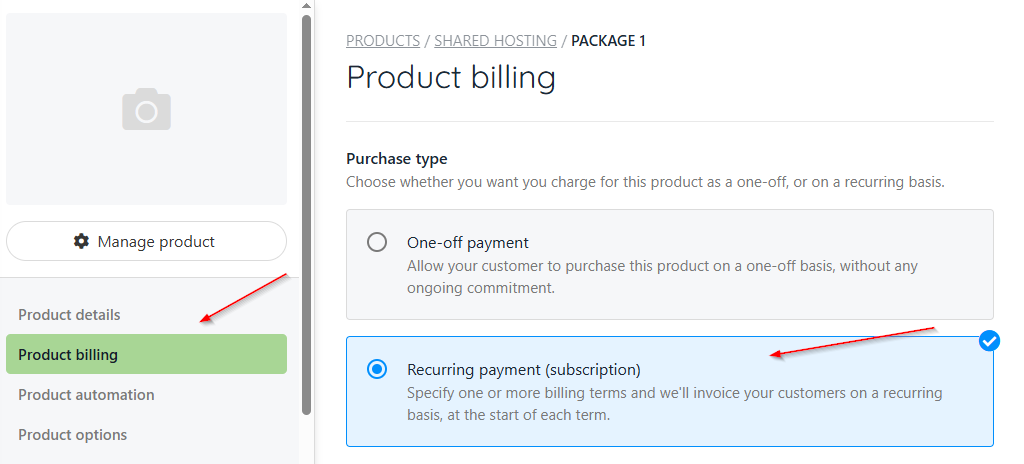
4. Click **Manage Product**, go to [Product Billing](/using-upmind/product-management/how-to-add-product-billing#/), and under Purchase Type, you can make it a **Recurring Payment**.
<Frame caption="Click manage product">
  <img src="https://mintcdn.com/upmind/FQ1NhxALxjSHvvWW/images/fb/b4f14d5b83230a6c.png?fit=max&auto=format&n=FQ1NhxALxjSHvvWW&q=85&s=1f0a39e957a3a1a842f18240ab5062c1" alt="Click manage product" width="506" height="493" data-path="images/fb/b4f14d5b83230a6c.png" />
</Frame>

<Frame caption="Make it a recurring payment">
  <img src="https://mintcdn.com/upmind/pcUdSuxUJ6LgBXnd/images/fb/9e476976dc7c1097.png?fit=max&auto=format&n=pcUdSuxUJ6LgBXnd&q=85&s=c44a7137c449a4d73924d6c9d74c034b" alt="Make it a recurring payment" width="1024" height="464" data-path="images/fb/9e476976dc7c1097.png" />
</Frame>

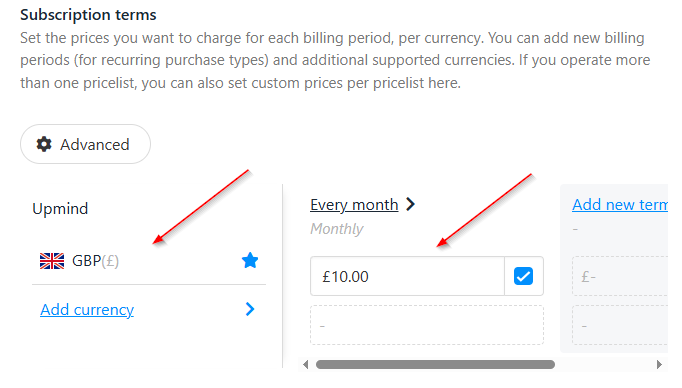
5. Under `Subscription Terms`, type in an amount and choose the currency.
<Frame caption="Choose amount and currency">
  <img src="https://mintcdn.com/upmind/z5ofg3t7by4uN44v/images/fb/ee88fad5df09000c.png?fit=max&auto=format&n=z5ofg3t7by4uN44v&q=85&s=00959d05d3d89bea5c9a56c8ece909c6" alt="Choose amount and currency" width="682" height="388" data-path="images/fb/ee88fad5df09000c.png" />
</Frame>

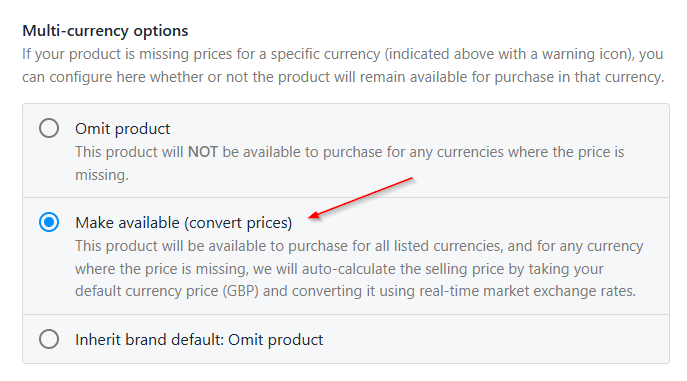
6. You can update the `Multi-currency options`.
<Frame caption="Select multi-currency option">
  <img src="https://mintcdn.com/upmind/Lh8hC132BWHpvRbz/images/fb/4f51ac82fcbd3be6.png?fit=max&auto=format&n=Lh8hC132BWHpvRbz&q=85&s=63a744c1b43485d5ed65144e38c1b165" alt="Select multi-currency option" width="687" height="381" data-path="images/fb/4f51ac82fcbd3be6.png" />
</Frame>

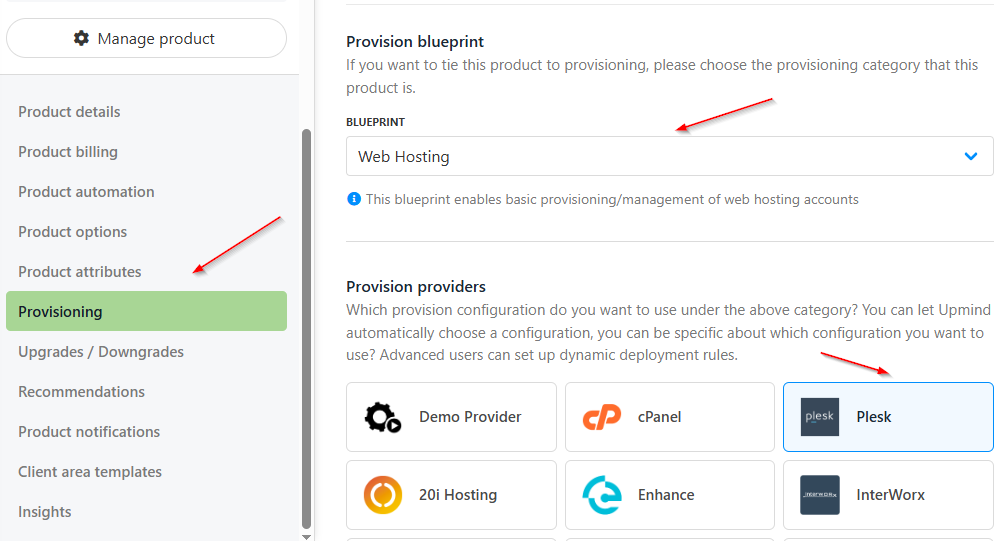
7. You can also go to `Provisioning` to choose your **Provision Blueprint** and **Provider**.
<Frame caption="Choose the provision blueprint and provider">
  <img src="https://mintcdn.com/upmind/ZsIo0APxdVb_gFS-/images/fb/248c9b1e89eeb778.png?fit=max&auto=format&n=ZsIo0APxdVb_gFS-&q=85&s=068efd855a8b6021784254c244fdaa07" alt="Choose the provision blueprint and provider" width="1007" height="541" data-path="images/fb/248c9b1e89eeb778.png" />
</Frame>

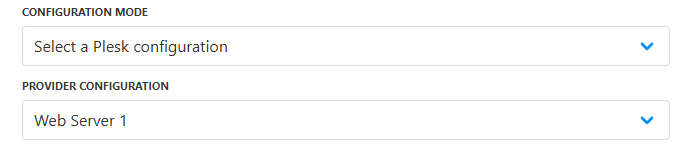
8. Select the `Configuration Mode` and choose your `Provider Configuration` (the Web Hosting that you created).
<Frame caption="Select configuration mode and provider configuration">
  <img src="https://mintcdn.com/upmind/FQ1NhxALxjSHvvWW/images/fb/b2f71b93035205df.png?fit=max&auto=format&n=FQ1NhxALxjSHvvWW&q=85&s=79f227d109d5b14212981fd4aff46651" alt="Select configuration mode and provider configuration" width="688" height="163" data-path="images/fb/b2f71b93035205df.png" />
</Frame>

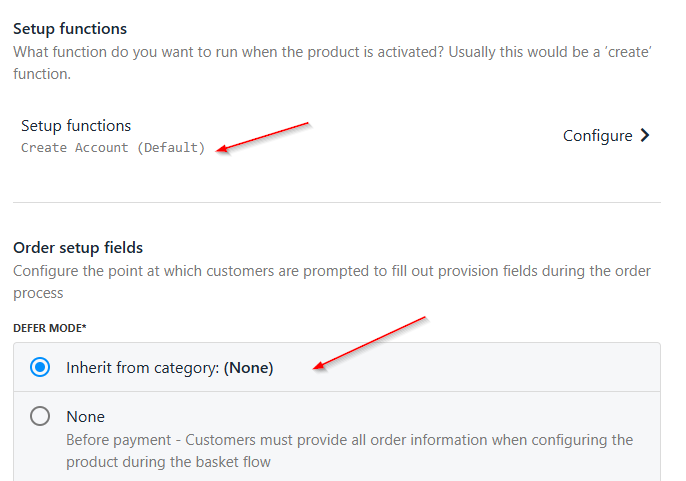
9. You can keep the `Setup Functions` as **Default**, and `Order Setup Fields` as **Inherit from category**.
<Frame caption="Choose setup functions and order setup fields">
  <img src="https://mintcdn.com/upmind/JUoAg6onJmXk_-rR/images/fb/e560fb4707f0f776.png?fit=max&auto=format&n=JUoAg6onJmXk_-rR&q=85&s=ad66748d516319d0db65f6f6c45bc936" alt="Choose setup functions and order setup fields" width="686" height="481" data-path="images/fb/e560fb4707f0f776.png" />
</Frame>

10. Under `Provision Fields`, you need to configure your **Package Identifier**.
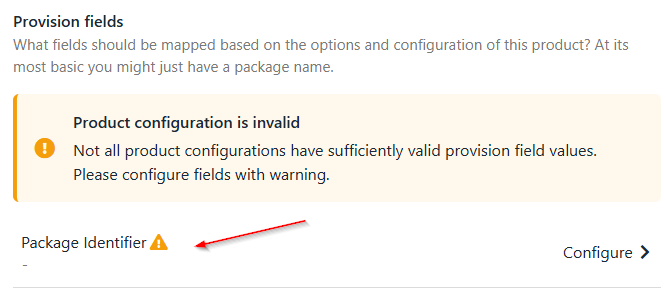
<Frame caption="Configure package identifier">
  <img src="https://mintcdn.com/upmind/wRuKrNY12tQZY8Rr/images/fb/3695ee3fd6d59db7.png?fit=max&auto=format&n=wRuKrNY12tQZY8Rr&q=85&s=c1ea0e32e756f65dc61f933b5a0294c4" alt="Configure package identifier" width="666" height="293" data-path="images/fb/3695ee3fd6d59db7.png" />
</Frame>

11. You can create the **Package** with all the details (for example, disk space, monthly bandwidth limit, etc.) from your panel. Add the **Package Name** to the `Package Identifier`.
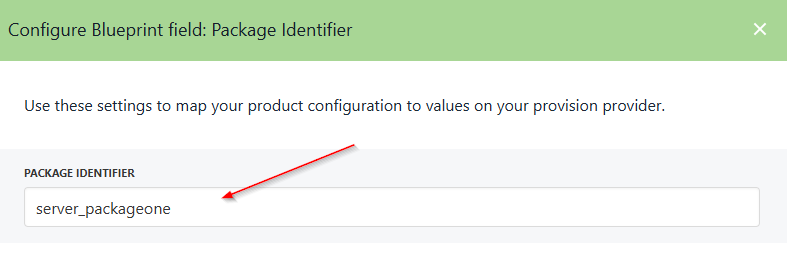
<Frame caption="Add package identifier name">
  <img src="https://mintcdn.com/upmind/1xguIfYUrfespmVI/images/fb/87038b5801966393.png?fit=max&auto=format&n=1xguIfYUrfespmVI&q=85&s=9d161fa8a149f3e260f3cf8db89bd833" alt="Add package identifier name" width="787" height="272" data-path="images/fb/87038b5801966393.png" />
</Frame>

The product should now be set up and live.

## How to purchase the hosting package as a client

1. A **Client** can purchase the **Hosting Package** by first going to `Place New Order` from the [Client Dashboard](/client-self-service/client-area/overview-of-the-client-area-dashboard#/).

<Frame caption="Select place new order">
  <img src="https://mintcdn.com/upmind/wRuKrNY12tQZY8Rr/images/fb/392e022cf3afefb0.png?fit=max&auto=format&n=wRuKrNY12tQZY8Rr&q=85&s=2af848b174751e9523fac5cede986df1" alt="Select place new order" width="1136" height="139" data-path="images/fb/392e022cf3afefb0.png" />
</Frame>

2. Select the **Category** and click **Add to basket**.
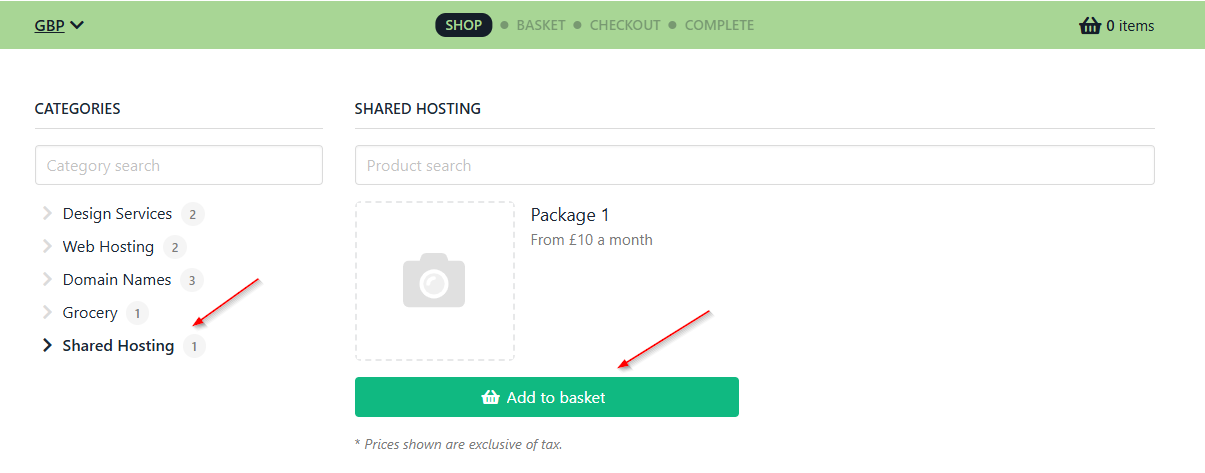
<Frame caption="Add to basket">
  <img src="https://mintcdn.com/upmind/z5ofg3t7by4uN44v/images/fb/e89365d7482d4990.png?fit=max&auto=format&n=z5ofg3t7by4uN44v&q=85&s=05bf336b23cedd00af6463b99e0dd1ef" alt="Add to basket" width="1205" height="473" data-path="images/fb/e89365d7482d4990.png" />
</Frame>

3. Add a `Domain Name` and click **Add to basket**.
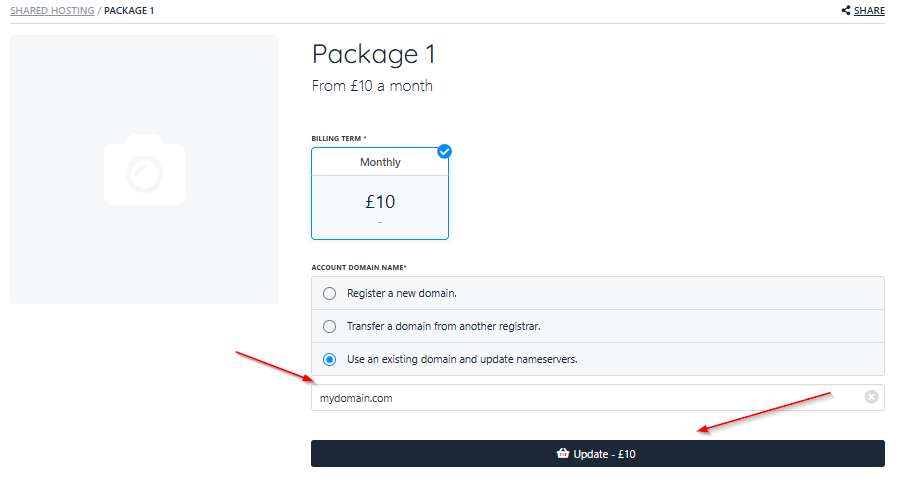
<Frame caption="Add domain name">
  <img src="https://mintcdn.com/upmind/c5sDUwEs8YpzGbjA/images/fb/94427aec333f9cb9.png?fit=max&auto=format&n=c5sDUwEs8YpzGbjA&q=85&s=2f9121fe56d12dde55a0ca4672fa1413" alt="Add domain name" width="924" height="489" data-path="images/fb/94427aec333f9cb9.png" />
</Frame>

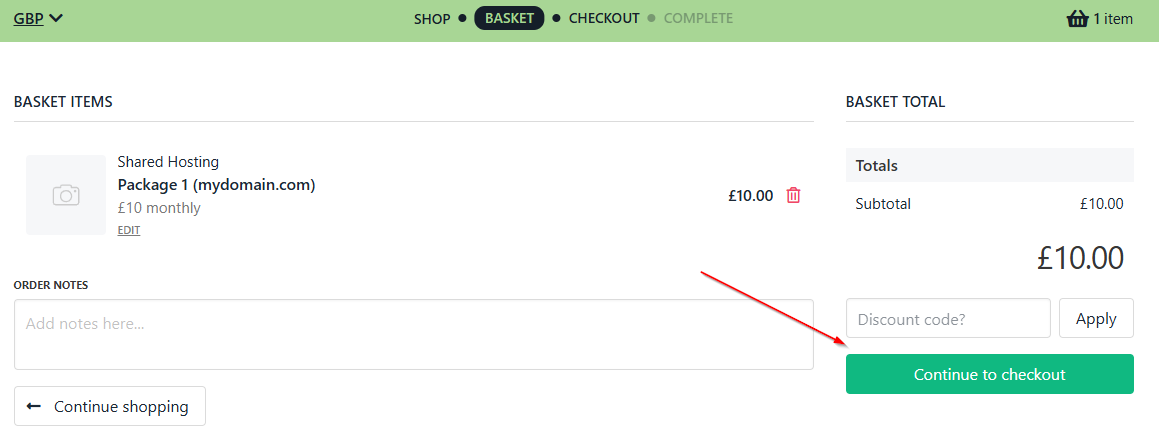
4. Click **Continue** to `Checkout`.

<Frame caption="Continue to checkout">
  <img src="https://mintcdn.com/upmind/2ooSxDpt6PiIGMr-/images/fb/04980e3661ecf648.png?fit=max&auto=format&n=2ooSxDpt6PiIGMr-&q=85&s=1f89c528be56edfc19f0c109148f6342" alt="Continue to checkout" width="1159" height="441" data-path="images/fb/04980e3661ecf648.png" />
</Frame>

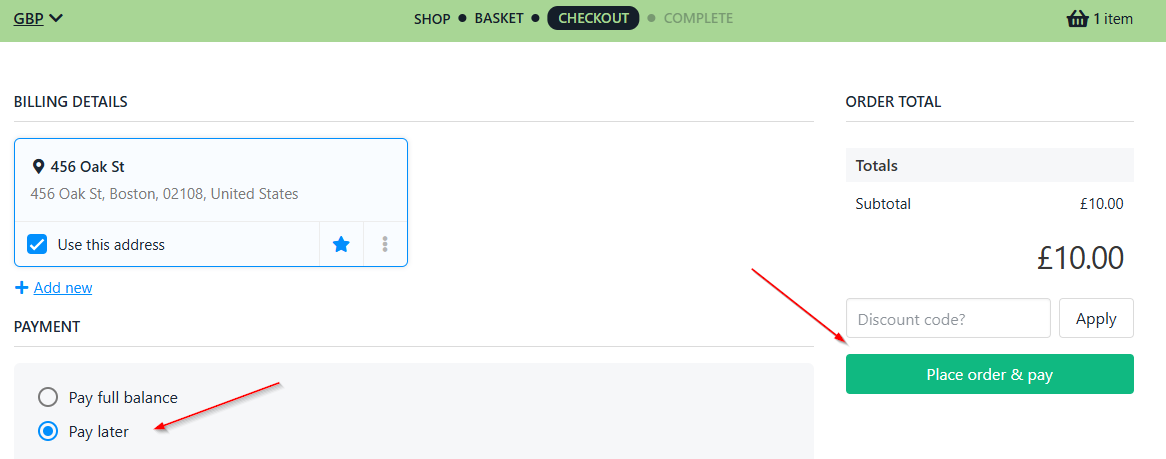
5. Select `Pay Later` and click on **Place Order and Pay**.
<Frame caption="Place order and pay">
  <img src="https://mintcdn.com/upmind/FQ1NhxALxjSHvvWW/images/fb/b3906393874d0124.png?fit=max&auto=format&n=FQ1NhxALxjSHvvWW&q=85&s=149935e6cf9a651d3cd97aebc823128a" alt="Place order and pay" width="1166" height="459" data-path="images/fb/b3906393874d0124.png" />
</Frame>

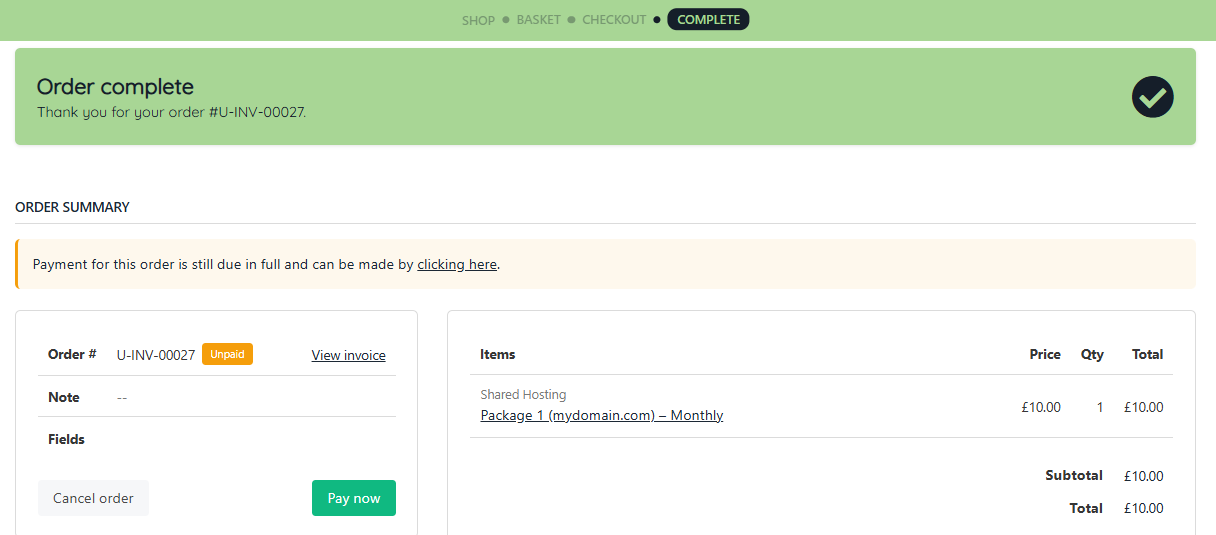
6. Your **Order** will be complete.

<Frame caption="Completed order">
  <img src="https://mintcdn.com/upmind/2ooSxDpt6PiIGMr-/images/fb/068926b5fd7abe4e.png?fit=max&auto=format&n=2ooSxDpt6PiIGMr-&q=85&s=bf5b63801673256c395823afa5f4d786" alt="Completed order" width="1216" height="535" data-path="images/fb/068926b5fd7abe4e.png" />
</Frame>

7. If you go to `Orders` from the `Admin Dashboard`, you can find the order. Click on it.

<Frame caption="Find the order from admin panel">
  <img src="https://mintcdn.com/upmind/Lh8hC132BWHpvRbz/images/fb/46192ef62f5c1240.png?fit=max&auto=format&n=Lh8hC132BWHpvRbz&q=85&s=1f8772ce629801d0589b126195cda504" alt="Find the order from admin panel" width="1324" height="239" data-path="images/fb/46192ef62f5c1240.png" />
</Frame>

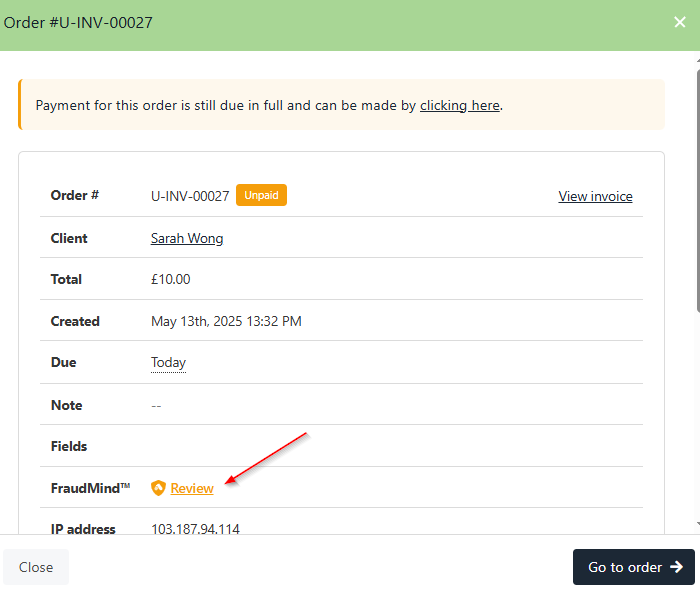
8. You can [Review the order](/setup-and-configuration/orders-services/how-to-review-orders#/) with [FraudMind](/setup-and-configuration/orders-services/fraudmindtm-fraud-prevention-and-security#/).
<Frame caption="Review order">
  <img src="https://mintcdn.com/upmind/kXD0Ya8PpcxxNm6Q/images/fb/4395e3f2169f2488.png?fit=max&auto=format&n=kXD0Ya8PpcxxNm6Q&q=85&s=74007dde49f5f10649ec06ced3bceee5" alt="Review order" width="700" height="595" data-path="images/fb/4395e3f2169f2488.png" />
</Frame>

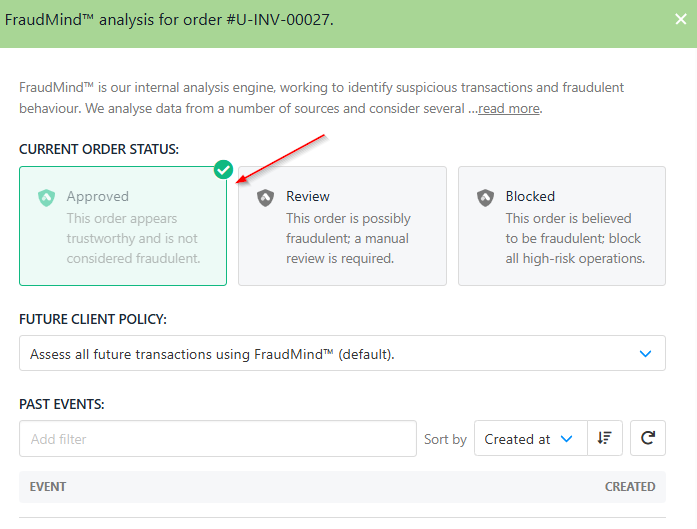
9. Approve it.

<Frame caption="Approve order">
  <img src="https://mintcdn.com/upmind/FQ1NhxALxjSHvvWW/images/fb/af0499c410f441d6.png?fit=max&auto=format&n=FQ1NhxALxjSHvvWW&q=85&s=54b6c40fc0ea16805f27410431e9e51b" alt="Approve order" width="697" height="529" data-path="images/fb/af0499c410f441d6.png" />
</Frame>

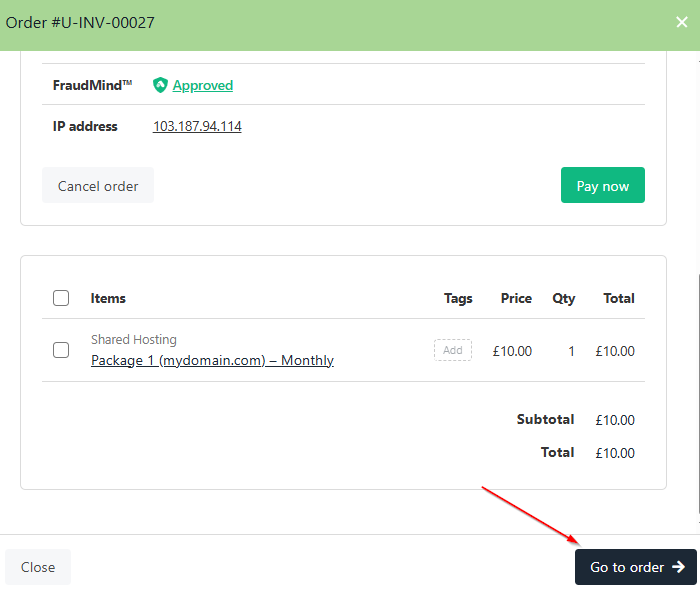
10. Select **Go to Order**.

<Frame caption="Go to order">
  <img src="https://mintcdn.com/upmind/Lh8hC132BWHpvRbz/images/fb/4adbccc6792b119c.png?fit=max&auto=format&n=Lh8hC132BWHpvRbz&q=85&s=8b596d15c3531c84d47ca978b09edf39" alt="Go to order" width="700" height="598" data-path="images/fb/4adbccc6792b119c.png" />
</Frame>

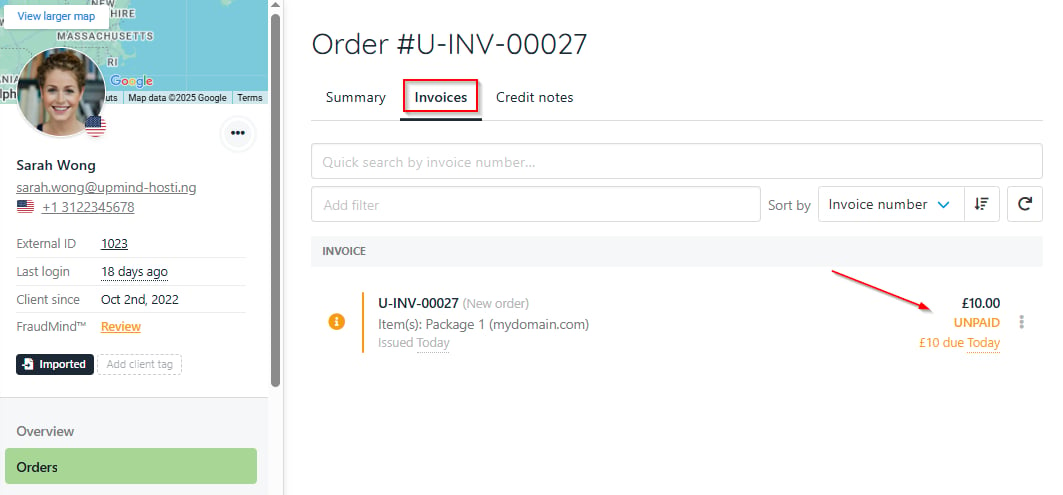
11. Select `Invoices` and click on the **Order**.
<Frame caption="Select invoice and the order">
  <img src="https://mintcdn.com/upmind/VnCXiz5rboywDnvn/images/fb/dcad94476736b66d.png?fit=max&auto=format&n=VnCXiz5rboywDnvn&q=85&s=2bbeb07eb7ddac210b96e562383e9cc9" alt="Select invoice and the order" width="1063" height="495" data-path="images/fb/dcad94476736b66d.png" />
</Frame>

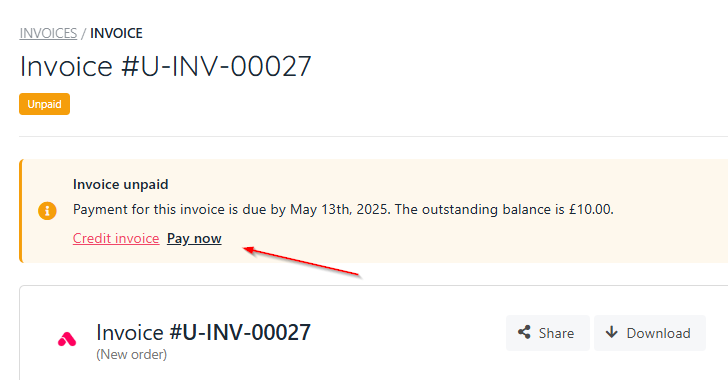
12. Click on **Pay Now**.

<Frame caption="Select pay now">
  <img src="https://mintcdn.com/upmind/c5sDUwEs8YpzGbjA/images/fb/966d78534775526f.png?fit=max&auto=format&n=c5sDUwEs8YpzGbjA&q=85&s=8f899688df82ef4a4c27f3be8ed06c2b" alt="Select pay now" width="728" height="380" data-path="images/fb/966d78534775526f.png" />
</Frame>

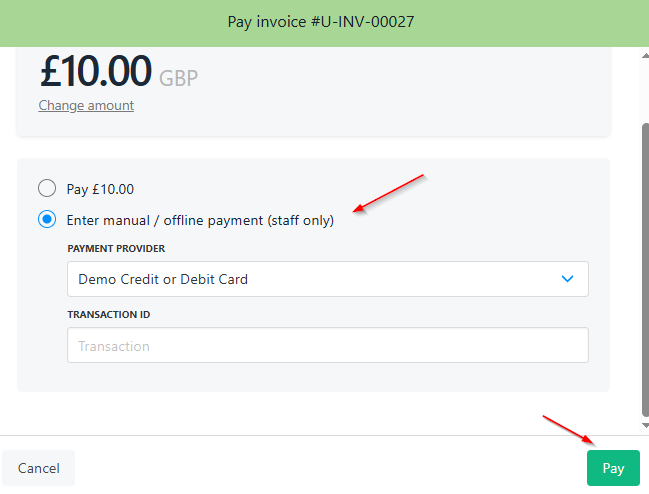
13. Make the **Manual Payment**.

<Frame caption="Manual payment">
  <img src="https://mintcdn.com/upmind/c5sDUwEs8YpzGbjA/images/fb/948d7b962268426d.png?fit=max&auto=format&n=c5sDUwEs8YpzGbjA&q=85&s=f2f2fe5206822d9ac010f68ae28e14a4" alt="Manual payment" width="649" height="494" data-path="images/fb/948d7b962268426d.png" />
</Frame>

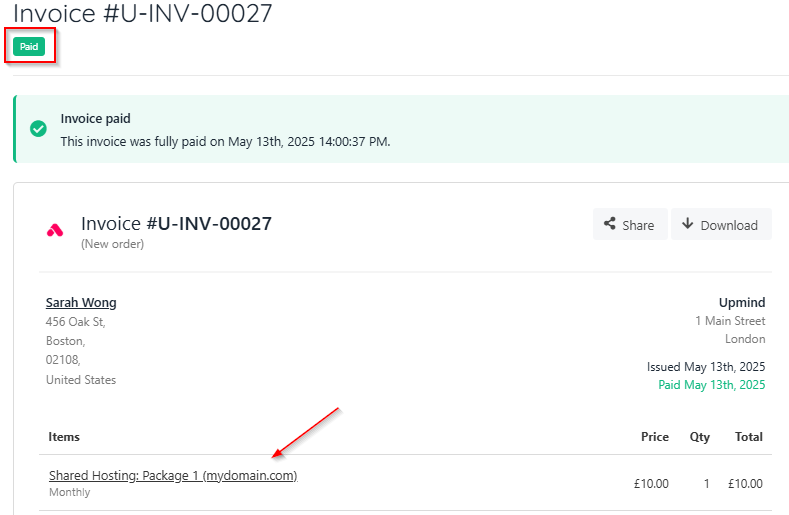
14. It will mark it as paid. Click on the **Product**.
<Frame caption="Select the product">
  <img src="https://mintcdn.com/upmind/uxzVUXAKtJ2bRWCI/images/fb/6583f5ee41ffc556.png?fit=max&auto=format&n=uxzVUXAKtJ2bRWCI&q=85&s=ee7a26a5d2e7505c4c26ba748ba026c8" alt="Select the product" width="789" height="515" data-path="images/fb/6583f5ee41ffc556.png" />
</Frame>

15. In the back end of the `Manage` tab, it will trigger the system to run a **Create Command**.
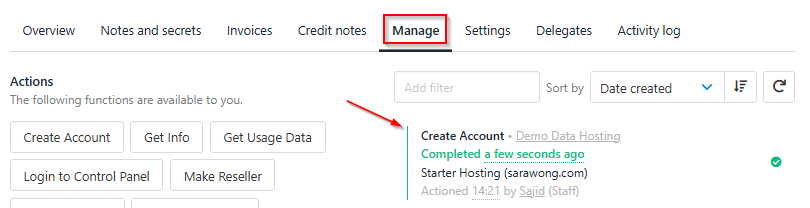
<Frame caption="Manage tab">
  <img src="https://mintcdn.com/upmind/uxzVUXAKtJ2bRWCI/images/fb/6c0b24294f84a152.png?fit=max&auto=format&n=uxzVUXAKtJ2bRWCI&q=85&s=7734745f76260f02baf4b8db340fc3d9" alt="Manage tab" width="810" height="208" data-path="images/fb/6c0b24294f84a152.png" />
</Frame>

16. You can also see the `Activity log`.
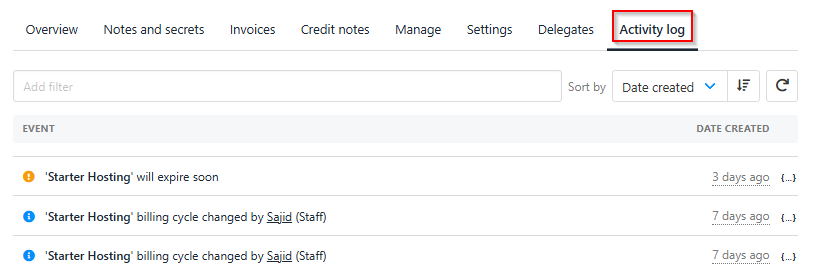
<Frame caption="Activity log">
  <img src="https://mintcdn.com/upmind/VnCXiz5rboywDnvn/images/fb/d3d36f32d6b37e89.png?fit=max&auto=format&n=VnCXiz5rboywDnvn&q=85&s=9eb97277b2810cc4cda363fa3c848b58" alt="Activity log" width="816" height="273" data-path="images/fb/d3d36f32d6b37e89.png" />
</Frame>

17. You can log in to the `Control Panel` now as the **Admin**.
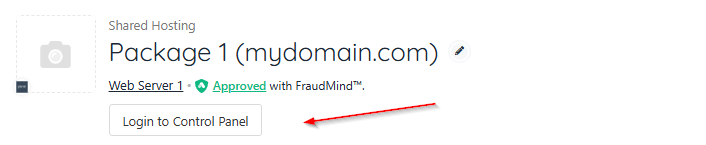
<Frame caption="Admin control panel login">
  <img src="https://mintcdn.com/upmind/5gi4DQpw4X76kT6T/images/fb/ba053cd0f54ff05e.png?fit=max&auto=format&n=5gi4DQpw4X76kT6T&q=85&s=031d26c0373868f2af8cf905c8ce20ec" alt="Admin control panel login" width="706" height="145" data-path="images/fb/ba053cd0f54ff05e.png" />
</Frame>

18. You can also log in as a **Client**.
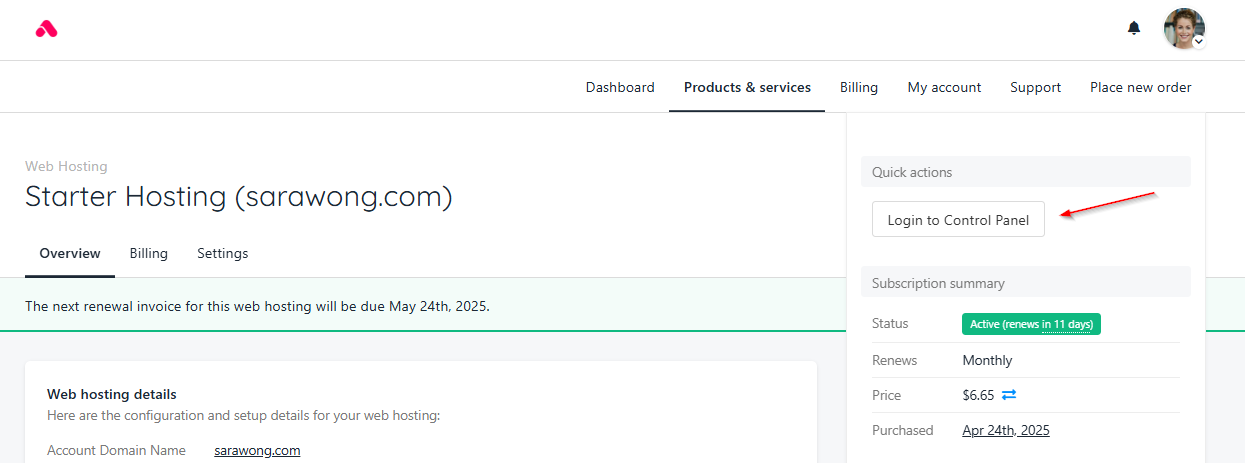
<Frame caption="Client control panel login">
  <img src="https://mintcdn.com/upmind/Lh8hC132BWHpvRbz/images/fb/47609466405e9423.png?fit=max&auto=format&n=Lh8hC132BWHpvRbz&q=85&s=f970e06390d1b9e8325200496630bb8f" alt="Client control panel login" width="1245" height="463" data-path="images/fb/47609466405e9423.png" />
</Frame>