> ## Documentation Index
> Fetch the complete documentation index at: https://docs.upmind.com/llms.txt
> Use this file to discover all available pages before exploring further.
# How to Add Paytm as a Payment Method in Upmind
> Set up Paytm to take payments in Upmind.
[Paytm](https://paytm.com/) is a widely used digital payment platform in India. Integrating Paytm with Upmind allows you to accept payments through UPI, wallets, credit/debit cards, and net banking.
A webhook must be configured between Paytm and Upmind for payment callbacks to be received and orders to be completed automatically.
## Getting Paytm credentials
1. Log in to **Paytm** Business Dashboard.
2. Go to **Settings** > **Profile** > **Account Details** for **Merchant ID**, **Website**, **Industry Type**, and **Channel ID**.
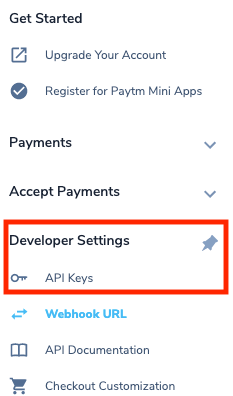
3. Go to **Developer Settings** > **API Keys** to generate your **Merchant Key**. Choose either **Test** or **Production** environment as needed.
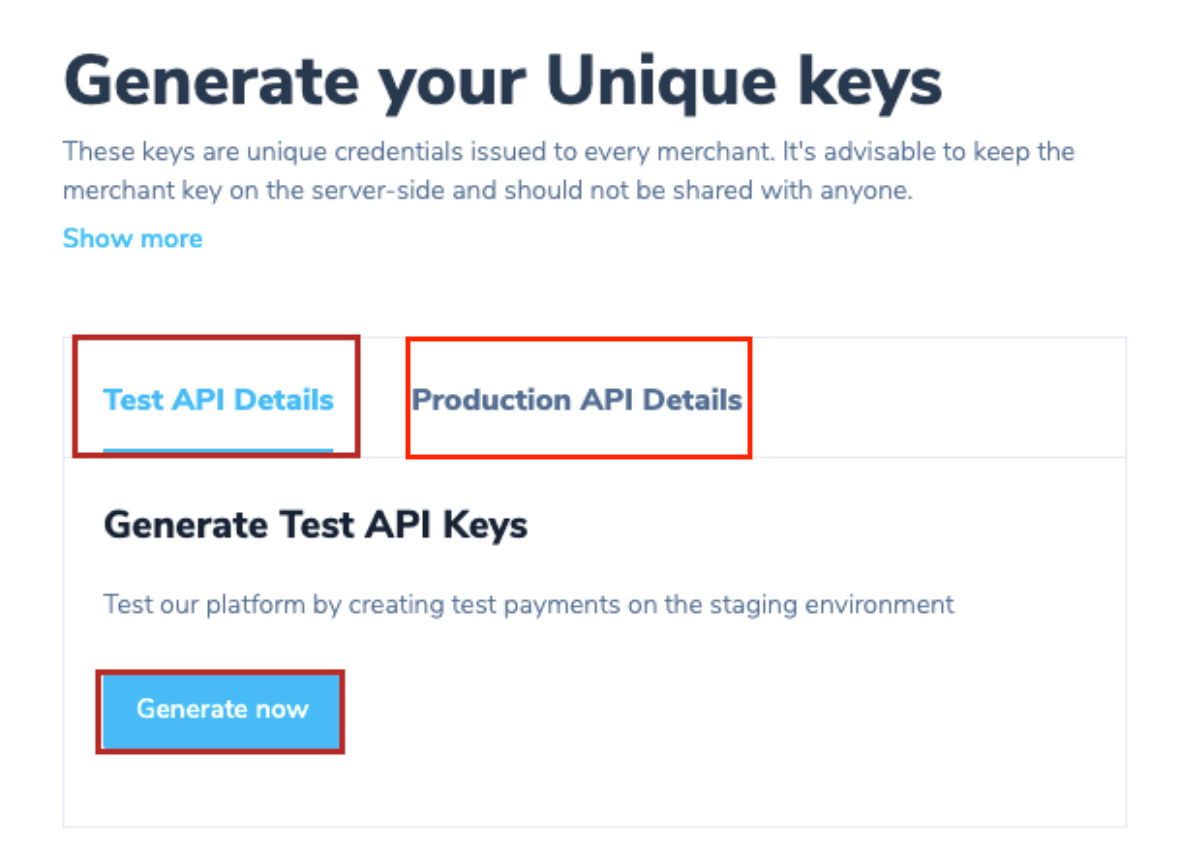 If test credentials are unavailable, request them via a Paytm support ticket. Some merchants may only have live credentials.
## Add Paytm in Upmind
1. Go to **Settings** > **Payment Providers** in your Upmind admin panel.
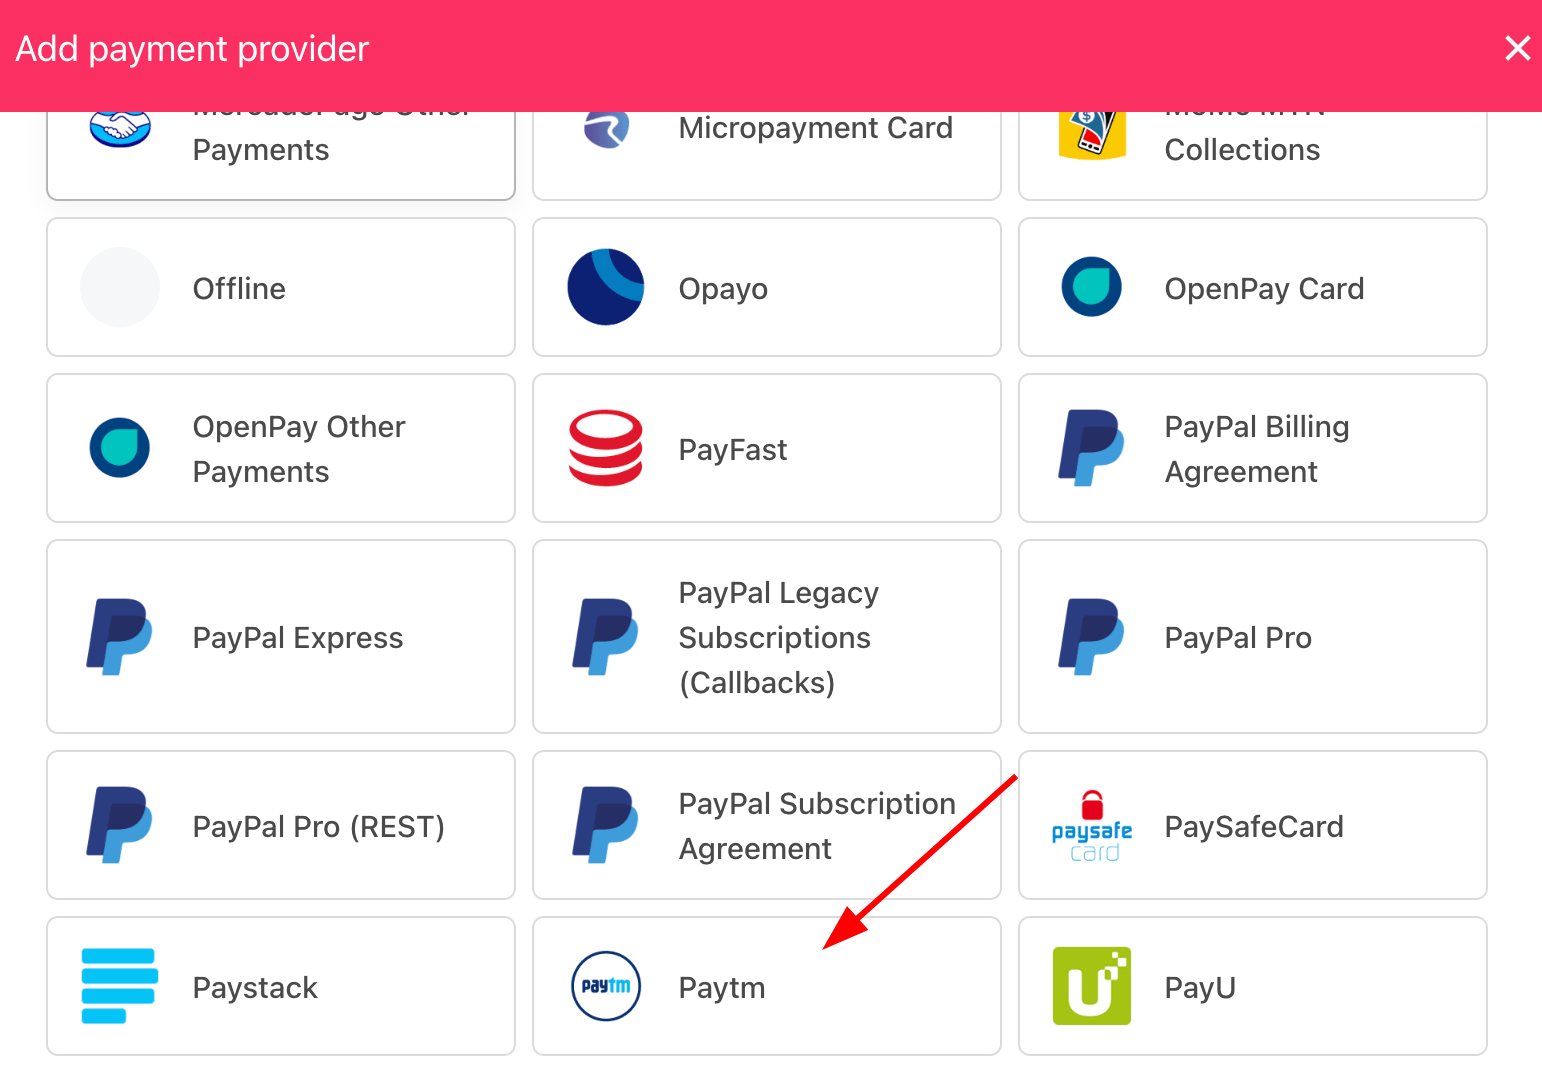
2. Select **Add Payment Provider** and choose **Paytm**.
If test credentials are unavailable, request them via a Paytm support ticket. Some merchants may only have live credentials.
## Add Paytm in Upmind
1. Go to **Settings** > **Payment Providers** in your Upmind admin panel.
2. Select **Add Payment Provider** and choose **Paytm**.
 ## Configure details
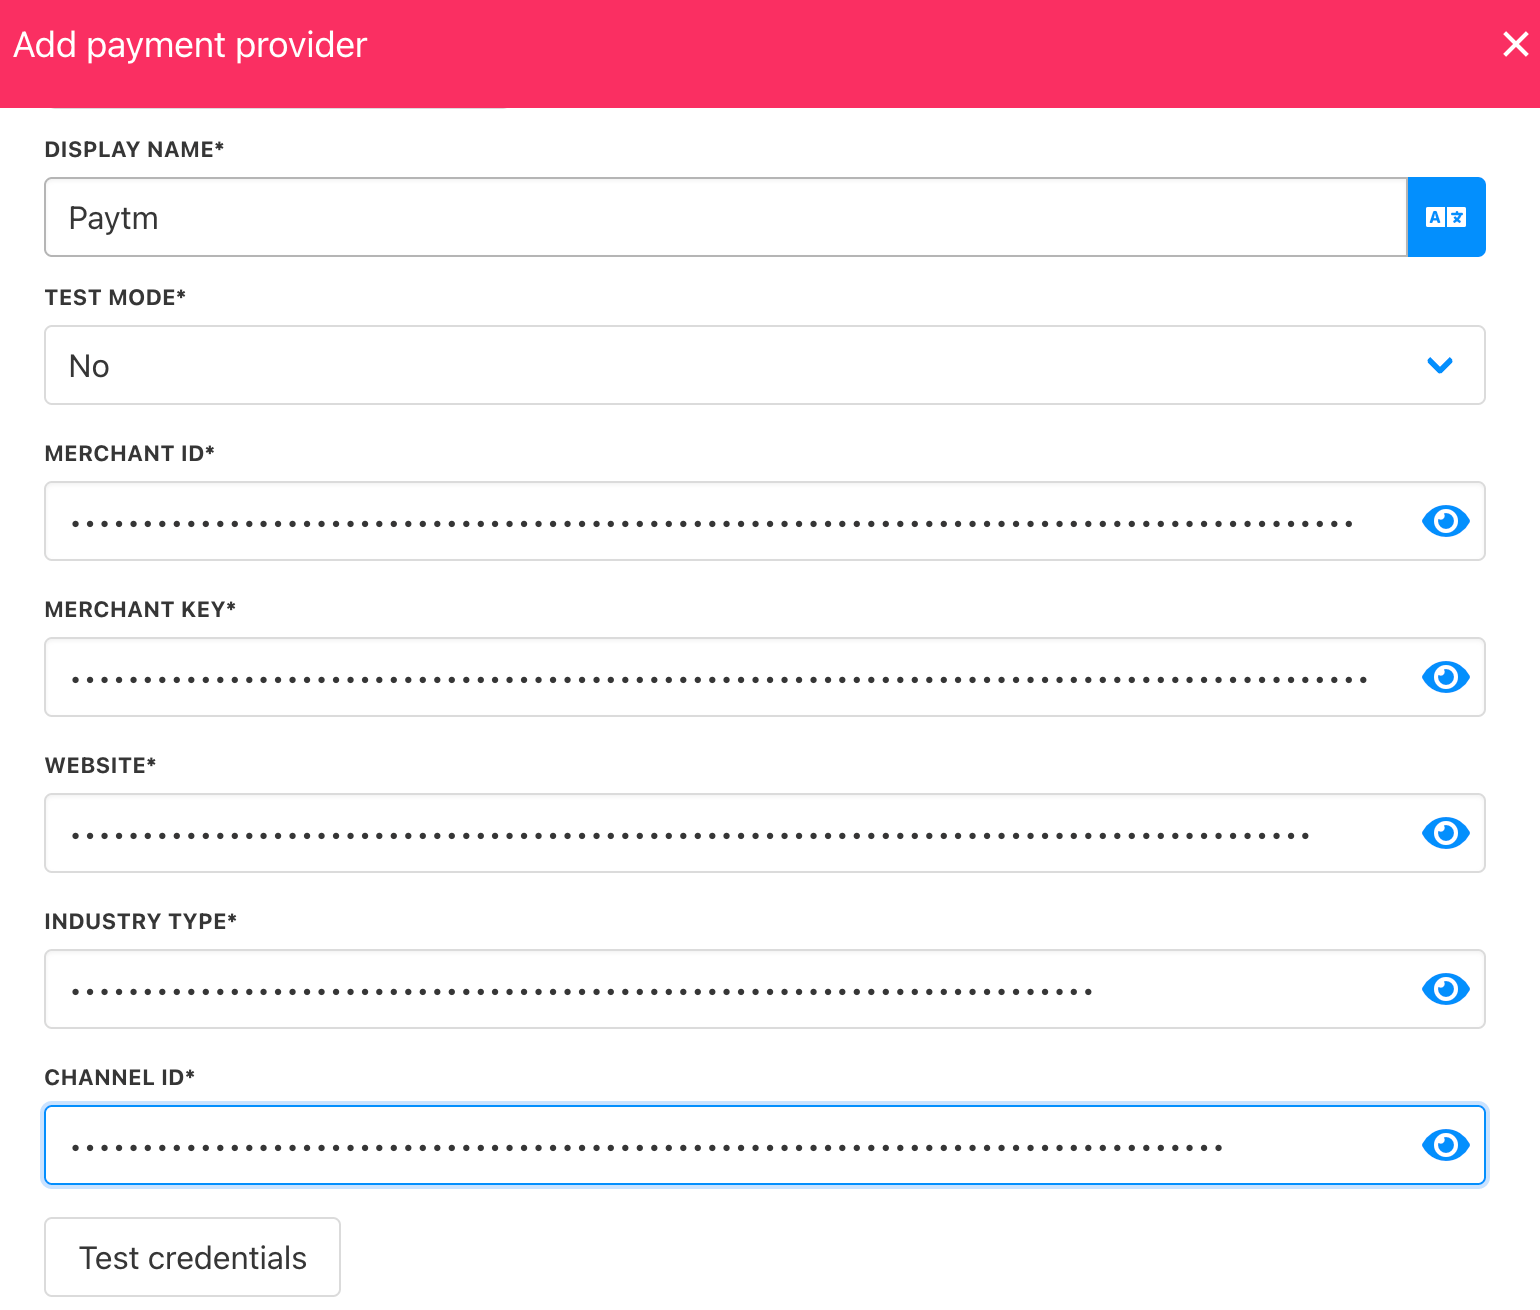
1. Enter **Display Name**. We suggest **Paytm**.
2. Configure **Test Mode**.
3. Enter **Merchant ID**, **Website**, **Industry Type**, and **Channel ID**.
4. Click **Test Credentials** to verify connection.
5. Set **Currency** (only INR supported) and optionally, add payment instructions for customers.
6. Click **Create** to save.
## Configure details
1. Enter **Display Name**. We suggest **Paytm**.
2. Configure **Test Mode**.
3. Enter **Merchant ID**, **Website**, **Industry Type**, and **Channel ID**.
4. Click **Test Credentials** to verify connection.
5. Set **Currency** (only INR supported) and optionally, add payment instructions for customers.
6. Click **Create** to save.
 ## Configure Paytm Webhook
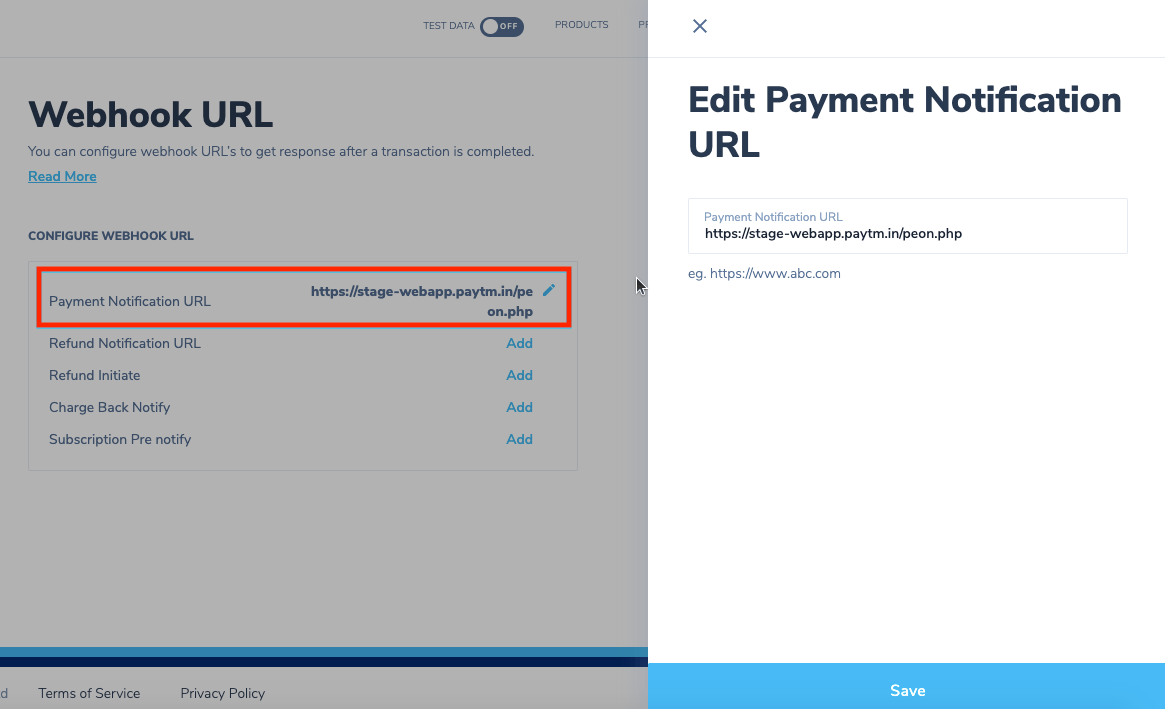
After adding **Paytm**, Upmind will generate a webhook URL. This URL must be added to your Paytm account for payment and refund notifications.
## Configure Paytm Webhook
After adding **Paytm**, Upmind will generate a webhook URL. This URL must be added to your Paytm account for payment and refund notifications.
 1. Log in to your **Paytm** Business Dashboard.
2. Go to **Developer Settings**.
3. Select **Webhook URL**.
1. Log in to your **Paytm** Business Dashboard.
2. Go to **Developer Settings**.
3. Select **Webhook URL**.
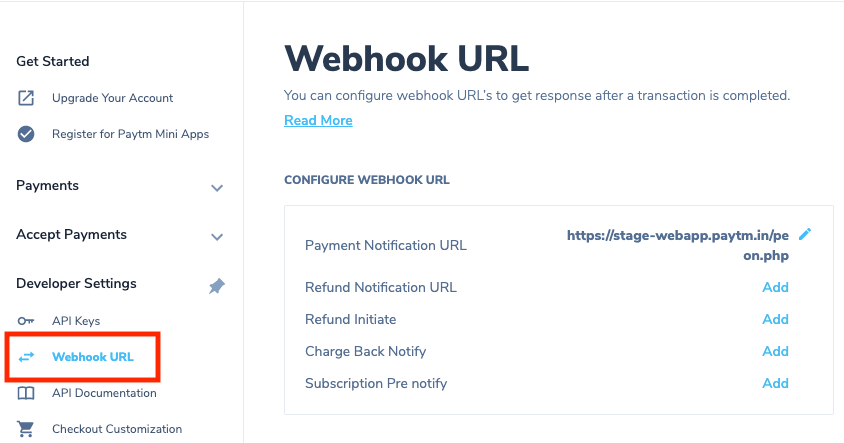 4. Add the Upmind webhook URL for both payment and refund events.
 5. To enable the Refund API, please submit a request to Paytm Support at [pg.support@paytmpayments.com](mailto:pg.support@paytmpayments.com).
If you are using multiple Merchant IDs (MIDs), the Refund API needs to be enabled separately for each MID. Please make sure to include all relevant MIDs in your request so they can be activated accordingly.
## Editing the payment method
Go to **Settings** > **Payment Providers**. Click the three dots next to `Paytm` and select **Edit**.
## How to Enable EMI payments on Paytm
EMI is not enabled by default on Paytm accounts. To get the EMI payment mode activated on your MID, you need to **contact your Paytm account manager** or **submit a request** through the [Paytm contact page](https://paytmpayments.com/contact-us#developer).
If you are using multiple MIDs, the EMI payment mode needs to be requested and enabled separately for each MID.
Standard EMI on Paytm is available for both credit card and debit card transactions across all checkout flows supported by Paytm.
### Supported banks
Credit Card EMI is currently supported by 19 banks, including:
* HDFC BANK
* SBI BANK
* ICICI BANK
* AXIS BANK
* BANK OF BARODA
* HSBC BANK
* RBL BANK
* AMERICAN EXPRESS
* IDBI BANK
* YES BANK
* INDUSLND BANK
* STANDARD CHARTERED BANK
* CITI BANK
* KOTAK BANK
* IDFC FIRST BANK
* AU SMALL FINANCE BANK
* ONE CARD
* FEDERAL BANK
* CANARA BANK
* SCAPIA
Debit Card EMI is supported by:
* HDFC BANK
* ICICI BANK
* KOTAK BANK (will be available soon)
### How it works for your customers
For **Credit Card EMI**, the customer selects the EMI option at checkout, enters their card details, and chooses an EMI tenure. The bank then takes around 5–7 working days to approve and convert the transaction into EMI. If the bank rejects the conversion, the customer pays the full amount as per their credit card billing cycle.
For **Debit Card EMI**, the bank requires the customer's mobile number to check eligibility. If eligible, a ₹1 verification transaction is processed first, and upon success, the loan is booked against the transaction amount. The customer then pays EMI as per the plan selected at checkout.
Once EMI is enabled on your MID by Paytm, it will be available as a payment option within your Paytm checkout automatically. No further configuration is needed in Upmind.
For the full list of supported banks, interest rates, and integration details, refer to the [Paytm Standard EMI documentation](https://www.paytmpayments.com/docs/affordability-standard-emi-introduction).
5. To enable the Refund API, please submit a request to Paytm Support at [pg.support@paytmpayments.com](mailto:pg.support@paytmpayments.com).
If you are using multiple Merchant IDs (MIDs), the Refund API needs to be enabled separately for each MID. Please make sure to include all relevant MIDs in your request so they can be activated accordingly.
## Editing the payment method
Go to **Settings** > **Payment Providers**. Click the three dots next to `Paytm` and select **Edit**.
## How to Enable EMI payments on Paytm
EMI is not enabled by default on Paytm accounts. To get the EMI payment mode activated on your MID, you need to **contact your Paytm account manager** or **submit a request** through the [Paytm contact page](https://paytmpayments.com/contact-us#developer).
If you are using multiple MIDs, the EMI payment mode needs to be requested and enabled separately for each MID.
Standard EMI on Paytm is available for both credit card and debit card transactions across all checkout flows supported by Paytm.
### Supported banks
Credit Card EMI is currently supported by 19 banks, including:
* HDFC BANK
* SBI BANK
* ICICI BANK
* AXIS BANK
* BANK OF BARODA
* HSBC BANK
* RBL BANK
* AMERICAN EXPRESS
* IDBI BANK
* YES BANK
* INDUSLND BANK
* STANDARD CHARTERED BANK
* CITI BANK
* KOTAK BANK
* IDFC FIRST BANK
* AU SMALL FINANCE BANK
* ONE CARD
* FEDERAL BANK
* CANARA BANK
* SCAPIA
Debit Card EMI is supported by:
* HDFC BANK
* ICICI BANK
* KOTAK BANK (will be available soon)
### How it works for your customers
For **Credit Card EMI**, the customer selects the EMI option at checkout, enters their card details, and chooses an EMI tenure. The bank then takes around 5–7 working days to approve and convert the transaction into EMI. If the bank rejects the conversion, the customer pays the full amount as per their credit card billing cycle.
For **Debit Card EMI**, the bank requires the customer's mobile number to check eligibility. If eligible, a ₹1 verification transaction is processed first, and upon success, the loan is booked against the transaction amount. The customer then pays EMI as per the plan selected at checkout.
Once EMI is enabled on your MID by Paytm, it will be available as a payment option within your Paytm checkout automatically. No further configuration is needed in Upmind.
For the full list of supported banks, interest rates, and integration details, refer to the [Paytm Standard EMI documentation](https://www.paytmpayments.com/docs/affordability-standard-emi-introduction).